Badging Configuration#
Badge templates, requirements, data rules, and penalties are configured in the Badges section of the Credentials administration panel of your Open edX instance. Each badge template needs at least one requirement and must be activated before it takes effect.
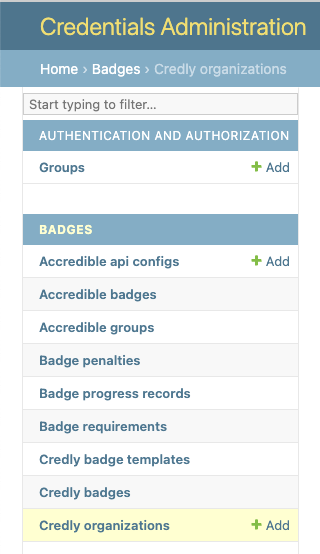
The screenshot below shows the main admin entry point where you access provider records, badge templates, requirements, penalties, and issued badge data.
Provider Setup#
Use the provider-specific pages in this section when you need to configure provider credentials, synchronize badge templates or groups, or understand provider-specific behavior such as webhooks and synchronization rules.
Badge Templates#
Credentials stores provider-side badge definitions as badge templates.
Credly exposes them as badge templates at https://<your-credentials-host>/admin/badges/credlybadgetemplate/.
Accredible exposes the equivalent records as groups at https://<your-credentials-host>/admin/badges/accrediblegroup/.
Badge templates and groups cannot be created manually in the Open edX Credentials administration panel. You must first synchronize them from the external provider. See Credly Configuration or Accredible Configuration.
Open the template or group record to review and update badge configuration. This detail page is where you manage provider-specific attributes, requirements, penalties, and activation state.
The screenshot below shows the badge template detail page used to review badge-specific configuration.
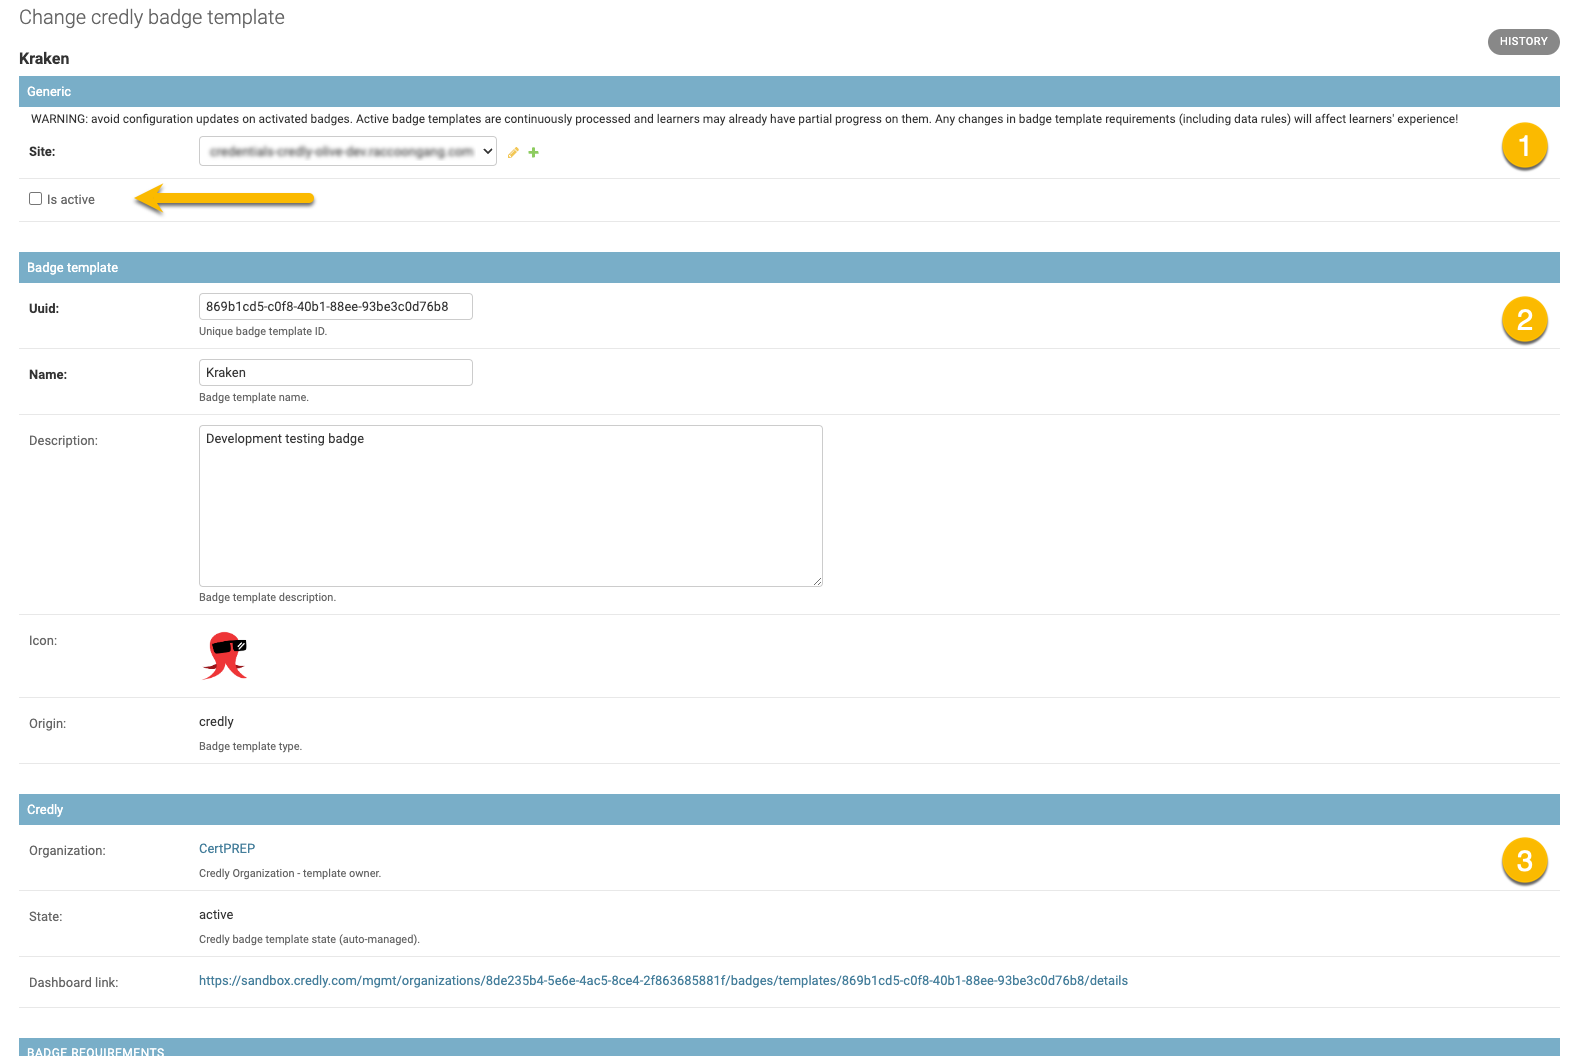
The badge template detail page contains the following sections:
Section |
Description |
|---|---|
Generic |
Shared settings such as site assignment and activation state. |
Badge template |
Badge-specific fields such as name, description, image, and origin. These values are populated from the remote provider during synchronization. |
Credly or Accredible |
Provider-managed fields such as state, dashboard link, and organization or API configuration. The section label depends on the provider. See Credly Configuration or Accredible Configuration. |
Configured requirements |
Inline requirement records for this badge template. See Badge Requirements. |
Configured penalties |
Inline penalty records for this badge template. See Badge Penalties. |
Badge Requirements#
Requirements describe what must happen for a learner to earn a badge. At least one requirement must be associated with a Badge Template. A Badge Template detail page includes the inline requirements section where you add and edit requirements. A badge template can have multiple requirements, and all requirements must be fulfilled before the system issues a badge. The badge template must be activated before it takes effect.
The screenshot below shows the inline badge requirements section on the badge template detail page.
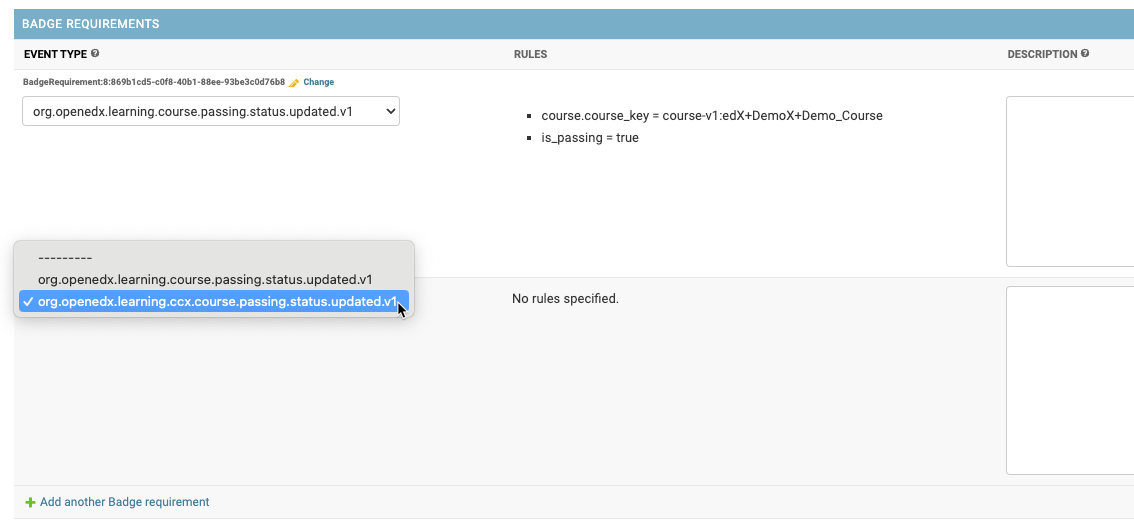
Each requirement has the following fields.
Event type - the Open edX platform event that must occur. The default supported events are:
org.openedx.learning.course.passing.status.updated.v1- course grade updated.org.openedx.learning.ccx.course.passing.status.updated.v1- CCX course grade updated.
Any public signal from the openedx-events library can extend this set (see Badging Settings).
Rules - a list of configured data rules (if any). See Data Rules.
Description - an optional human-readable reminder about the requirement’s purpose.
Group - controls OR/AND behavior across requirements. See Badge Requirement Groups.
Note
You can use any public signal from the openedx-events library if its payload includes learner-identifying PII in UserData.
Badge Requirement Groups#
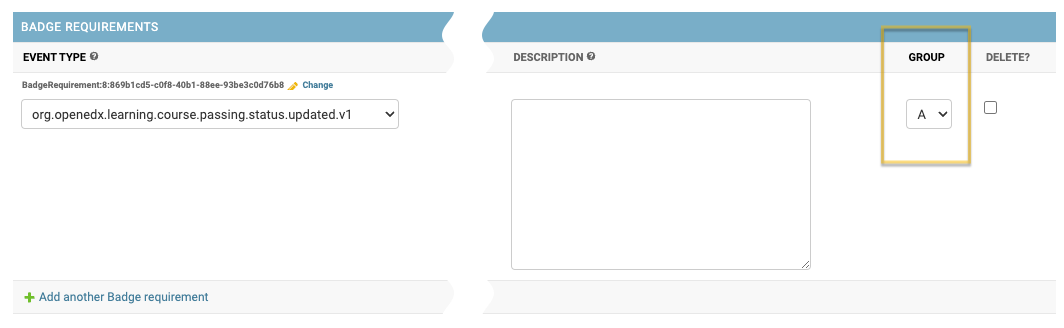
Each Badge Requirement has a Group field.
On the badge requirement detail page, you select one of the available group values from A to Z. New requirements default to the next available letter.
Requirements in the same group use OR logic - fulfilling any one of them fulfills the group. Requirements in different groups use AND logic - all groups must be fulfilled before the badge is issued.
Use groups when a learner can satisfy one part of a badge in multiple ways. For example, if a learner may complete either Course A or Course B to satisfy one part of a badge, place both requirements in the same group. If the learner must also complete Course C, put that requirement in a separate group.
For example:
Group
ARequirement 1: pass Course A
Requirement 2: pass Course B
Group
BRequirement 3: pass Course C
In this configuration, the learner must fulfill either Requirement 1 or Requirement 2, and also fulfill Requirement 3.
The screenshot below continues the requirement form and highlights the Group field.
For more grouping examples, see Configuration Examples.
Data Rules#
Data rules are configured on the Badge Requirement detail page. They allow you to combine multiple conditions for a single badge requirement. All data rules on that requirement must match (AND logic). Data rules do not link requirements together - each rule set applies only to its own requirement’s incoming event.
To add or edit a data rule:
Navigate to
https://<your-credentials-host>/admin/badges/credlybadgetemplate/orhttps://<your-credentials-host>/admin/badges/accrediblegroup/and open the template or group you want to configure.In the inline requirements list, use the
Changelink for the requirement you want to edit.On the requirement detail page, find the “Data Rules” section and add a new item.

Each data rule describes a single expected payload value. Key paths are generated from the event type of the parent requirement.
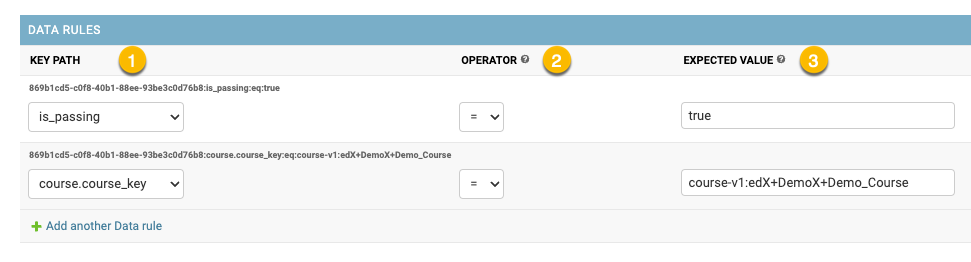
The numbered markers on the screenshot correspond to data rule fields:
# |
Field |
Description |
|---|---|---|
1 |
Key path |
Dot-separated path to a field in the event payload. Available key paths depend on the selected event type and come from the event structure defined in openedx-events. |
2 |
Operator |
Comparison operation: |
3 |
Expected value |
The expected value of that event field, for example |
Note
For boolean fields, the following string values are accepted:
True:
"true","True","yes","Yes","+"False:
"false","False","no","No","-"
See Configuration Examples for some examples of how data rules can be applied to achieve specific conditions.
Badge Penalties#
Badge penalties are configured in the inline penalties section of the Badge Template detail page. They reset learner progress when a specific event occurs. Use them for cases where previously earned progress should no longer count, for example when a passing grade later changes to failing. For details on how this leads to badge revocation during processing, see Badges Processing.
Penalties are optional. A badge template can have zero or more penalties.
A penalty is configured with an event type, its own data rules, and one or more linked badge requirements. When an incoming event matches all of the penalty’s data rules, the linked requirements are reset for that learner.
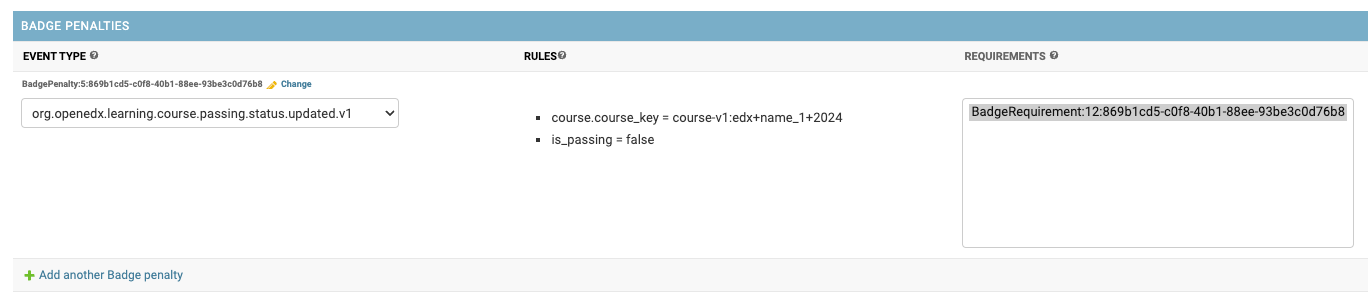
For example, the penalty shown in the screenshot above could listen for a course.passing.status.updated event where is_passing equals false.
If that event occurs, the learner’s progress for the linked requirements is reset.
Examples#
Use Configuration Examples for complete requirement and data rule configurations for common badge setups.
Activation and Deactivation#
Use the badge template or group detail page to activate or deactivate badge processing for a template.
Navigate to
https://<your-credentials-host>/admin/badges/credlybadgetemplate/orhttps://<your-credentials-host>/admin/badges/accrediblegroup/.
Open the badge template or group detail page and set the
Is activecheckbox as needed.
Click Save at the bottom of the page to save and activate or deactivate the configuration.
Important
After you activate a badge template, matching incoming events can fulfill its requirements, update learner progress, and trigger badge issuance when all required conditions are met.
Deactivating a badge template stops future processing for that template. Already issued badges are retained. Inactive badge templates are ignored during event processing.